


2003: Little things took up a lot of time. The rain gutters on the doors were rotted out so I built new ones. Some times I had to buy parts that would be hard for me to make.
Most of the metal parts are available for the XKE but they are expensive so quite often I would build parts that I could buy just to keep the costs down.


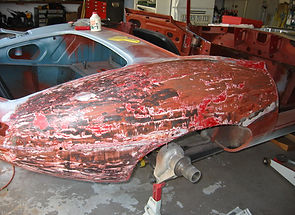

All of the original paint was removed so that I had clean metal to primer and paint. This car had six layers of different color paint so it took quite a bit of paint remover to get down to bare steel. I had to do this with the whole car.

I found that the aerosol cans of Aircraft Paint Remover worked best. I bought these at the local auto parts store.
When I rebuild another car I'll have the mobile soda blasters come to the house and I'll save many hours of work.
Once paint was removed from a part I would paint it with Eastwood Rust Inhibitor. I find that this works well and is benign when painted with another brand of paint.
Once I completed welding parts in place I would add all the components back on to make sure everything fit. This is what the rear end looked like when I finished.
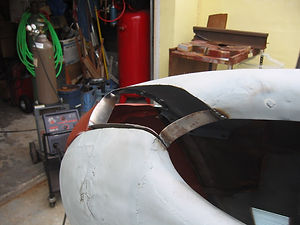
The next challenge was the bonnet. It actually looked good from the outside but inside it was rotted out pretty badly. Virtually all of the problems on the bonnet were covered up with aluminum tape and body putty. I spent most of 2003 working on the bonnet. I didn't work every weekend and sometimes I'd skip a couple of weeks. I usually spent about seven hours on the days that I did work.

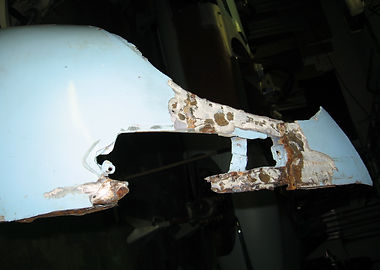
The bonnet is formed out of four major pieces of stamped sheet metal. Both of the fender portions were rusted very badly and covered up with body putty so I had to remove all the paint in order to see what kind of damage I was going to have to repair.


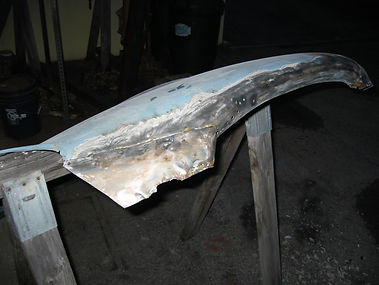
I cut outlines of the damaged areas with construction paper and used them as a guide to shape the new metal once I cut out the rusted areas. These pictures show the paper form along with the outline of the piece that I would cut out of 20 gauge sheet metal. Everything was shaped by hand or with a small Harbor Freight brake. I don't have any of the forming tools that are available so when I needed an edge on something I just cut the metal and welded it onto the piece that needed it.
The results came out very well.
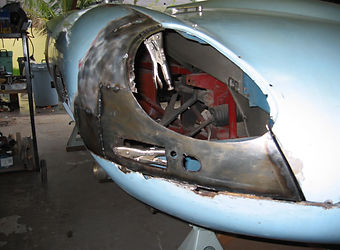


After the repairs around the headlights on both wings were complete I had to replace the flanges on both wings. I cut strips of metal to match the curve of the fender and welded them into place. I had to be careful that I did not weld too fast because it warps the metal.

Once I got the metal strip tacked in place I was able to complete a continuous weld along the whole strip - a little bit at a time.
I was able to match the bolt holes up with the center piece of the bonnet and drill the holes.

The next challenge was the center piece of the bonnet. Much of the frontal area was rotted out and needed to be replaced but the challenge was the compound curves around the headlights and the top of the lower valence. I used small pieces of 20 gauge metal that I could shape by hand and built the compound curve in pieces that were all welded together. Someone with an English Wheel and the proper skills could had done a better job of this.
I found rust all around the opening on the bonnet. There were a lot of pinholes that could be patched with a spot of weld, but the larger areas were just cut out and replaced with new metal.


This is how I built up the right side by the headlight. I tacked everything in place and if it didn't fit the way I wanted I would pull it out and redo it. After all the welding is completed I would grind down the welds so that I had a smooth surface. A thin layer of body putty was used over top of everything to get the exact shape
Next was the lower valence. I should have taken a picture of this before I started to remove the paint because it looked pretty good but it turned out to be the worst piece in the whole car. Multiple layers of sheet metal were laid on top of old rusted metal and when the repair rotted out they just put more metal on top of the old stuff.


I was able to form the lower part of the valence but the edges were full of pinholes that created a real challenge. I was able to replace all the metal but I didn't get the shape I wanted. Ultimately I opted to replace the whole lower valence and that would have repercussions years later when everything went back together.
At this point I have done a lot of work that I have not detailed here but all those little things take up a lot of time in 2003.